In today’s data-driven world, effective database performance monitoring is crucial for maintaining the smooth operation of critical systems.
Datasentinel is a PostgreSQL performance monitoring tool that helps you identify and fix performance problems. It does this by collecting data about your database and then analyzing that data to identify potential problems.
One key aspect of successful monitoring in Datasentinel is real-time alerting, which notifies you in case if there is a problem with your databases and instances.
Integrating Datasentinel’s alerting feature with the OpenAI ChatGPT API takes the monitoring capabilities to a new level by automating issue resolution. You can leverage artificial intelligence to generate real-time responses and recommendations on how to fix problems raised by Datasentinel.
In this post, we’ll explore the process of integrating Datasentinel’s alerting feature with the ChatGPT API, and how it can revolutionize your database monitoring and troubleshooting workflow. We will delve into the setup of the backend infrastructure using FastAPI, the creation of the API methods necessary to communicate with Datasentinel agent and alerting feature, the configuration of the webhook to receive alerts from Datasentinel, and the creation of a dedicated API method to interact with ChatGPT API for automated issue resolution.
Revisiting the Datasentinel integration with FastAPI
Before we integrate ChatGPT with the Datasentinel alerting API, we need to go through the previous tutorial to integrate Datasentinel with FastAPI. Once we go through the steps to build the backend using FastAPI, we’ll add more APIs to understand the Datasentinel alerting API endpoints and then move on to building the API method related to ChatGPT.
So check out the tutorial here and be sure add your own database connection.
API endpoints you’ll create
At the end of this tutorial, you’ll be able to build APIs with the following endpoints:
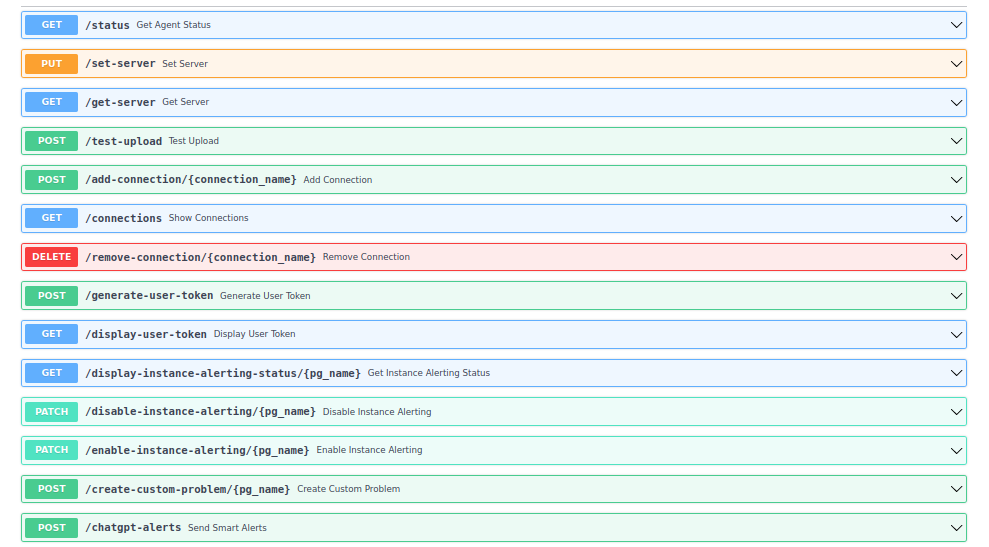
Let’s start with the first one we haven’t introduced in the FastAPI integration tutorial.
Checking the server information
To get the server name and the port number of your running Datasentinel platform, you can write the following API method in the main.py file:
@app.get("/get-server")
async def get_server():
    url = f"{base_url}/api/server"
    headers = {"api-token": datasentinel_token}
    response = requests.get(url, headers=headers, verify=False)
    content = json.loads(response.content)
    return JSONResponse(content)
The code above is a FastAPI method that retrieves server information from Datasentinel. It makes a GET request to the Datasentinel API endpoint /api/server using the provided base_url and datasentinel_token variables.
The response contains the hostname and port of the server like the following:
{
  "host": "<your-datasentinel-platform-server>",
  "port": 443
}
Testing the upload to Datasentinel platform
We need to make sure that our Datasentinel platform server sees the Datasentinel agent. To do that, you can test the upload process using the following POST request:
@app.post("/test-upload")
async def test_upload():
    url = f"{base_url}/api/server/test-upload"
    headers = {"api-token": datasentinel_token}
    response = requests.post(url, headers=headers, verify=False)
    content = json.loads(response.content)
    return JSONResponse(content)
This code is another FastAPI route that performs an HTTP POST request to the Datasentinel API endpoint /api/server/test-upload. This route is defined with the @app.post("/test-upload") decorator, indicating that it handles POST requests to the /test-upload URL path.
The response indicates that the status is a success:
{
  "status": "OK"
}
Removing a connection
If you want to remove a specific connection that you have in Datasentinel platform, you can send a DELETE request as follows:
@app.delete("/remove-connection/{connection_name}")
async def remove_connection(connection_name):
    url = f"{base_url}/api/connections/{connection_name}"
    headers = {"api-token": datasentinel_token}
    response = requests.delete(url, headers=headers, verify=False)
    content = json.loads(response.content)
    return JSONResponse(content)
This code represents a FastAPI route that handles an HTTP DELETE request. Specifically, it defines a route for deleting a connection in Datasentinel using the /remove-connection/{connection_name} endpoint by sending a DELETE request to the Datasentinel API endpoint /api/connections/{connection_name}. The connection_name here is an input field to the remove_connection and it’s the name of the connection that you have on the Datasentinel platform.
Note: To add a new connection, you need to use the add_connection method in the previous post. In this tutorial, we’ve called our connection db_connection1.
Datasentinel Alerting APIs
We’ve set up the basic APIs to connect with the Datasentinel Agent API. Now, let’s communicate with the Alerting APIs.
Generating the user token
Until now, we used the datasentinel token in most API methods that needed authentication. To send requests to Alerting APIs, you need to use a user-specific token which expires one day after you generate it. This token is called a user token.
To generate this user token, you can write the following method:
from decouple import config


datasentinel_platform_server = "https://<your-datasentinel-platform-host>"
datasentinel_user = config("DATASENTINEL_USER")
datasentinel_pwd = config("DATASENTINEL_PWD")


@app.post("/generate-user-token")
async def generate_user_token():
    url = f"{datasentinel_platform_server}/ds-api/user-token"
    response = requests.post(
                    url,
                    auth=(datasentinel_user, datasentinel_pwd),
                    verify=False
                )
    content = json.loads(response.content)
    return JSONResponse(content)
The code above represents a FastAPI route that sends an HTTP POST request to generate a user token in Datasentinel. The route is defined with the @app.post("/generate-user-token") decorator, indicating that it handles POST requests to the /generate-user-token URL path.
Inside the function, the code constructs the URL for the POST request by combining datasentinel_platform_server and /ds-api/user-token. The datasentinel_platform_server variable represents the server address or base URL of the Datasentinel platform sent to you in the initial Datasentinel free trial email.
The requests.post() method is called with the constructed URL and additional parameters. The auth parameter is used to provide authentication credentials in the form of a tuple (datasentinel_user, datasentinel_pwd). This is used for basic authentication where datasentinel_user and datasentinel_pwd represent the username and password for the Datasentinel user. The verify=False parameter disables SSL verification, which should be handled properly in production environments.
To be able to run this endpoint via the localhost:8000/docs FastAPI endpoint, you need install the python-decouple library. So put it inside the requirements.txt file and install it with pip install -r requirements.txt. You’ll also need to put the datasentinel username and password credentials in a .env file:
DATASENTINEL_USER=<your-datasentinel-username>
DATASENTINEL_PWD=<your-datasentinel-password>
You can find both credentials in the initial email that Datasentinel sent to you when you first signed up for the Datasentinel platform.
Once you generate the user token, you can save it in another environment variable inside the .env file as follows:
DATASENTINEL_USER_TOKEN=<your-datasentinel-user-token>
You’ll need this token and don’t confuse it with the datasentinel token we used previously.
Checking the user token
You can display useful information about the user token using the following method:
@app.get("/display-user-token")
async def display_user_token(user_token):
    url = f"{datasentinel_platform_server}/ds-api/user-token?token={user_token}"
    response = requests.get(
                    url,
                    auth=(datasentinel_user, datasentinel_pwd),
                    verify=False
                )
    content = json.loads(response.content)
    return JSONResponse(content)
This function expects a user_token parameter, which represents the token associated with the user.
Inside the function, we construct the URL for the GET request by combining datasentinel_platform_server, /ds-api/user-token, and the query parameter token={user_token}.
The requests.get() method is called with the same parameters as the previous method.
The response contains a JSON like the following:
{
  "organization_name": "<organization-name>",
  "email": "contact@datasentinel.io",
  "user": "<user-name>",
  "expire_time": "2023-05-16 09:07:49"
}
As you can see, some parameters are related to your personal account on the Datasentinel platform including when this user token will be expired. It turns out it expires one day after we generated it as mentioned above.
Setting up notification templates
To be able to receive notifications/alerts from Datasentinel platform, you need to enable it first and then set up a notification template based on a filter you set.
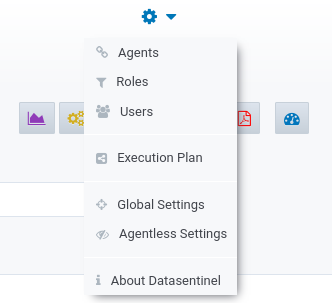
Go to the Datasentinel dashboard (your datasentinel platform server). Click on the dropdown at the top and choose Global Settings:
You’ll see the toggle of the Alerting is disabled by default. Turn it on then and click on the Notification templates button:
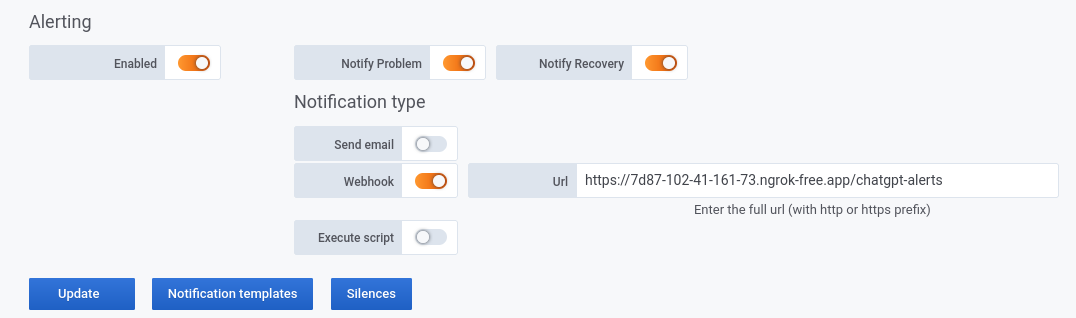
Note: Datasentinel can send alerts through emails, webhooks, and custom scripts. In this tutorial, we will use a webhook. Once we come to setting up the webhook, you’ll be able to fill in the webhook URL. But you can leave it blank for now.
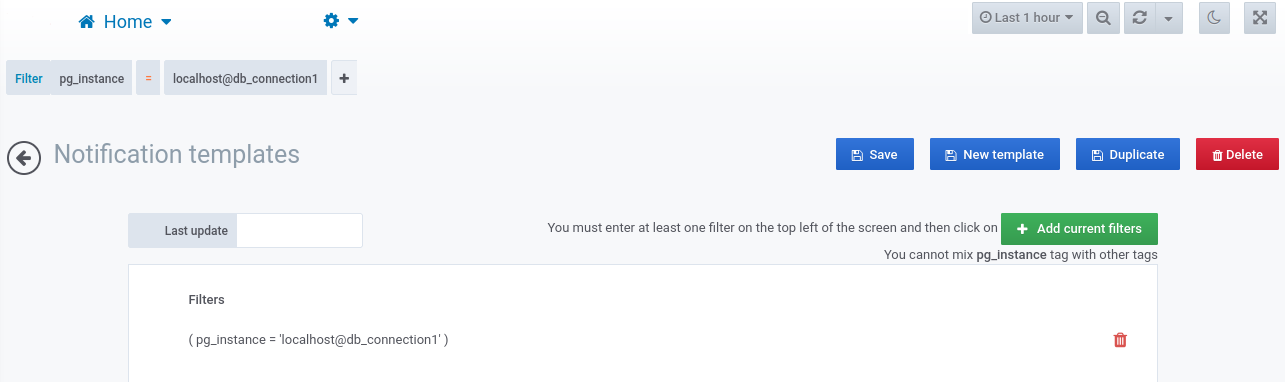
You’re now on a page where you can see the following button:
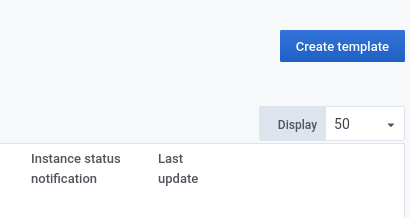
So click on it to create the template that you’ll have for the alerts. You can filter on the template using the filter drop downs on the left corner. Once you choose your filter(s), you can click on “Add current filters” as pressed here:
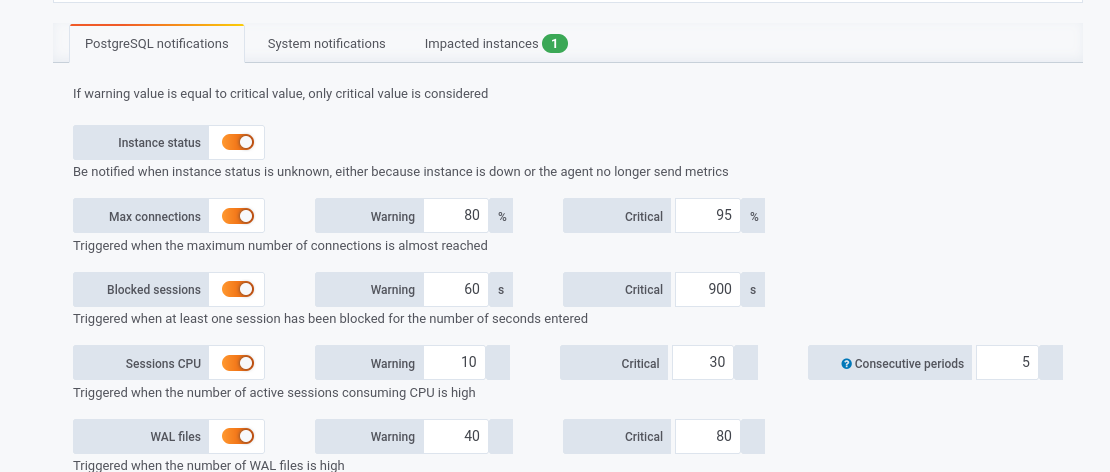
If you scroll down, you can even customize your filter for the errors and warnings your notifications will detect:
Now, back to setting up the API endpoints.
Displaying instance alerting status
To retrieve the alerting status of a specific PostgreSQL instance in Datasentinel, you can use the following code snippet:
datasentinel_user_token = config("DATASENTINEL_USER_TOKEN")


@app.get("/display-instance-alerting-status/{pg_name}")
async def get_instance_alerting_status(pg_name):
    server_name = base_url.split("//")[1].split(":")[0] # fetching "localhost" from "https://localhost:8383"
    pg_instance = f"{server_name}@{pg_name}"
    url = f"{datasentinel_platform_server}/ds-api/alerting/{pg_instance}/status"
    headers = {"user-token": datasentinel_user_token}
    response = requests.get(url, headers=headers, verify=False)
    content = json.loads(response.content)
    return JSONResponse(content)
The route is defined with @app.get("/display-instance-alerting-status/{pg_name}"). It expects a path parameter {pg_name} representing the name of the PostgreSQL instance.
The server name (the Datasentinel agent server) here is extracted from the base_url variable. This is achieved by splitting the URL string and retrieving the part after the double forward slashes after the https: (//), and before the colon (:). For example, from the URL https://localhost:8282, the server name would be the “localhost” string.
The pg_instance variable is then constructed by combining the server name and the pg_name path parameter. The pg_name is the connection name we previously set to db_connection1.
The URL for the GET request is constructed using the datasentinel_platform_server variable, which represents the server address or base URL of the Datasentinel platform coming from the .env file. It appends /ds-api/alerting/{pg_instance}/status to the base URL, where {pg_instance} is replaced with the constructed PostgreSQL instance name.
The headers dictionary is created to include the user-token header with the value of datasentinel_user_token. This token is required for authentication with Datasentinel and it’s different from the datasentinel_token.
Note: Take care here of the user-token key used here, not the api-token as we previously configured the headers when we set up the Datasentinel token.
The response should be similar to the following JSON:
{
  "enabled": true,
  "reason": "Current template filters: ( ( \"pg_instance\"='localhost@db_connection1' ) ) ",
  "id": "<instance-status-id>"
}
Disabling instance alerting
To disable the alerting feature for a specific PostgreSQL instance in the Datasentinel platform, you can use the following API method:
@app.patch("/disable-instance-alerting/{pg_name}")
async def disable_instance_alerting(pg_name):
    server_name = base_url.split("//")[1].split(":")[0]
    pg_instance = f"{server_name}@{pg_name}"
    url = f"{datasentinel_platform_server}/ds-api/alerting/{pg_instance}/disable"
    headers = {"user-token": datasentinel_user_token}
    response = requests.patch(url, headers=headers, verify=False)
    content = json.loads(response.content)
    return JSONResponse(content)
This FastAPI route is similar to the previous one except that it handles an HTTP PATCH request to disable the alerting feature for a specific PostgreSQL instance calling the /ds-api/alerting/{pg_instance}/disable Datasentniel API endpoint.
The response can contain the following:
{
  "enabled": false,
  "reason": "A silence has been created for the instance"
}
Silence is now created for the db_connection1 instance. This silence feature is useful in case you want to do some maintenance to your instance(s).
You can also create it manually as explained in the Datasentinel silence documentation.
Note: If you want to continue receiving alerts to your instance, you need to remove the silence by clicking on the red bin icon on the right. Then you need to enable alerts to the instance. There is also an API for that which is explained in the following section.
Enabling instance alerting
To enable instance alerting, you can use the following API method:
@app.patch("/enable-instance-alerting/{pg_name}")
async def enable_instance_alerting(pg_name):
    server_name = base_url.split("//")[1].split(":")[0]
    pg_instance = f"{server_name}@{pg_name}"
    url = f"{datasentinel_platform_server}/ds-api/alerting/{pg_instance}/enable"
    headers = {"user-token": datasentinel_user_token}
    response = requests.patch(url, headers=headers, verify=False)
    content = json.loads(response.content)
    return JSONResponse(content)
This FastAPI route is similar to the /disable-instance-alerting/{pg_name} endpoint except that it calls the /ds-api/alerting/{pg_instance}/enable Datasentniel API endpoint.
Demonstrating a PostgreSQL problem for alerts
To demonstrate a PostgreSQL problem that triggers alerts in Datasentinel, you can create the following API method:
@app.post("/create-custom-problem/{pg_name}")
async def create_custom_problem(pg_name, problem_message):
    server_name = base_url.split("//")[1].split(":")[0]
    pg_instance = f"{server_name}@{pg_name}"
    url = f"{datasentinel_platform_server}/ds-api/alerting/{pg_instance}/problems"
    headers = {"user-token": datasentinel_user_token}
    data = {
        "message" : f"{problem_message}"
        }
    response = requests.post(url, headers=headers, json=data, verify=False)
    content = json.loads(response.content)
    return JSONResponse(content)
This FastAPI route handles an HTTP POST request to create a custom problem for a specific PostgreSQL instance. This allows you to simulate a problem scenario and trigger alerts in Datasentinel.
You’ll send a request to the /ds-api/alerting/{pg_instance}/problems Datasentinel API endpoint. This POST request needs an additional parameter which is a JSON that contains the error message that we want to simulate. So the message is the key of that JSON in the data variable while the problem_message is an input parameter that you can customize according to your desire.
This is how you can test sending a problem message through the automated documentation on the /docs FastAPI endpoint:
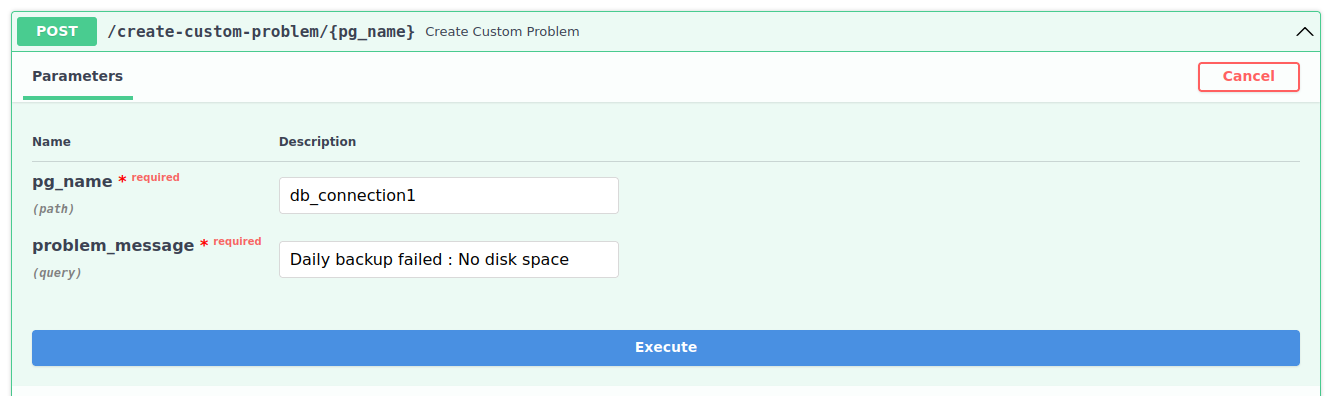
As you can see, we’ve entered the name of connection we want to send the error message to and we’ve also customized the error message. An example would be "Daily backup failed : No disk space".
The response should be a JSON similar to this:
{
  "id": "<instance-id-hash>",
  "event_time": "2023-05-15 11:25:12",
  "notification_type": "PROBLEM",
  "pg_instance": "localhost@db_connection1",
  "check_name": "custom",
  "check_state": "CRITICAL",
  "message": "Custom alert: Daily backup failed : No disk space",
  "email": false,
  "webhook": false,
  "script": false,
  "start_time": "",
  "server": "localhost"
}
As you can see, this JSON has information related to the issue that we customized. The message is prepended with “Custom alert: " to indicate that this issue is not a real issue in our database, it’s just something custom.
To be able to receive such real-time alert, you need enable an email, a webhook, or a script. Remember:
Once an issue occurs, you’ll see the alerts bell icon on the right corner of the Datasentinel platform:

Let’s set up a webhook.
Setting up a FastAPI webhook
A webhook is a way for an application or service to send real-time data to another application or service. The receiving application or service provides a URL endpoint where it expects to receive the webhook data. When an event occurs in the sending application, it will make an HTTP request, usually a POST request, to the webhook URL with the relevant data.
To set up a webhook through a web framework like FastAPI, you can use pyngrok which is a Python wrapper for ngrok, which is a tool that allows you to expose your local development server to the internet. So you can use it to put the localhost:8000 FastAPI endpoint to a public IP that you can use.
To use pyngrok, you can include it in the requirements.txt file and then install the file with pip.
Once pyngrok is ready, open a new terminal to run it using ngrok http 8000 which will allow your running localhost on port 8000 to be served through a URL. You’ll use this URL appended with an endpoint and then can copy and paste it to the webhook field on the Datasentinel global settings. Let’s leave that to the next section.
Now, the webhook is set up. What you need to do next, is to create a FastAPI endpoint that sends a POST request listening to that webhook.
Creating the webhook FastAPI endpoint
To create a webhook endpoint in FastAPI for handling incoming requests, you can define a POST route using the @app.post decorator and provide the desired endpoint URL. Here’s an example of creating a webhook endpoint called "/chatgpt-alerts" in FastAPI that we can use later when we integrate the alerts with ChatGPT:
@app.post("/chatgpt-alerts")
async def send_smart_alerts(request: Request):
    # Extract the alerts JSON data from the incoming webhook request
    json_data = await request.json()
    print(f"JSON data is here:\n{json_data}")
First, to make this work, you need to copy the URL you got from ngrok and append it with the /chatgpt-alerts route. So you’ll end up with a URL like this https://7d87-102-41-161-73.ngrok-free.app/chatgpt-alerts. Paste this URL to the Datasentinel platform global settings under the Alerting section.
Once you place the URL, click on the Update button and send a custom problem using the /create-custom-problem/{pg_name} FastAPI endpoint to be able to test it live.
You’ll see a print message sent on the terminal with the same JSON we received when we created a custom database problem.
To make this send_smart_alerts really smart, you need to make it more powerful and help the user take action to resolve the issue. We’ll do that with ChatGPT API in the next section.
Integrating ChatGPT with the Datasentinel Alerting API
To leverage the power of ChatGPT in generating smart alerts for Datasentinel, you can use the build upon the previous API method and make the send_smart_alerts() function look like the following:
import openai

# Set up the OpenAI API client
openai.api_key = config("OPENAI_API_KEY")


@app.post("/chatgpt-alerts")
async def send_smart_alerts(request: Request):
    json_data = await request.json()
    # Extract the problem message from the incoming webhook request
    error_message = json_data["message"].split("Custom alert: ")[1]

    print(f"Sending this error message: '{error_message}' to ChatGPT")
    # Call the OpenAI API to generate the solution to this db error with ChatGPT
    messages = [{"role": "user", "content": f"Fix the following PostgreSQL database error: {error_message}"}]
    messages.append({"role": "system", "content": "You're an expert in PostgreSQL database and have solved many database issues."})
    response = openai.ChatCompletion.create(
        model="gpt-3.5-turbo",
        messages=messages,
        max_tokens=500,
        temperature=0.5
        )

    # The generated text
    chatgpt_response = response.choices[0].message.content
    print(f"The solution to your alert message is:\n\n{chatgpt_response}")
This FastAPI route handles an HTTP POST request to generate smart alerts using ChatGPT based on the incoming webhook request from Datasentinel.
Here’s an overview of how it works:
We first import the openai module, which provides the necessary functionality to interact with the OpenAI API.
The api_key attribute of the openai module is set to the value retrieved from the OPENAI_API_KEY environment variable (defined in the .env file) using the config() function. The api_key is an authentication token that allows the client to make API requests to OpenAI’s services. If you don’t have it already, you can create a new one in your OpenAI account through the OpenAI API keys page.
Be sure to include openai in the requirements.txt file and install it with pip.
Similar to the previous design, the custom problem JSON is extracted from the incoming webhook request using await request.json(). The specific error message is extracted by splitting the “Custom alert: " prefix from the message as a pre-process step.
The extracted error message is then passed as an input to ChatGPT to generate a smart solution.
A list of messages is constructed for the ChatGPT conversation. The user’s message includes the extracted error message, while the system message provides a context that the recipient is an expert in PostgreSQL databases.
The openai.ChatCompletion.create() method is used to generate the response from ChatGPT. The model parameter specifies the ChatGPT model to use (which is gpt-3.5-turbo), messages contains a list of the user and system contents, max_tokens sets the maximum number of tokens the OpenAI can send in the response, and temperature controls the randomness of the response.
The generated response is extracted from the API response and stored in chatgpt_response which contains the solution to the database issue raised by the alert.
The response is then printed for debugging purposes and for this tutorial’s demo as indicated here:

Feel free to customize the code snippet to suit your specific requirements and integrate it into your existing application. You can try other custom alert messages. Ideally, if you have issues with your instance sitting on the Datasentinel platform, you should see solutions recommended by ChatGPT for them. Hence, you’ll not need to pre-process the message like we did when we removed the “Custom alert: " prefix.
You can also include this design into your own application based on your needs. Possibilities are endless here.
This article was originally published on Datasentinel, check it out.